- How do I download TeamViewer?
MANTECH is available to connect remotely to your instrument computer to answer questions, resolve challenges, and assist with any custom requests. TeamViewer is the software we use to connect remotely. Download the free version of TeamViewer here and we will walk you through the rest!
- Why are my Turbidity QCs failing?
One of the most common reasons for Turbidity QCs failing is due to DI water that is not degassed being used for blanks and standards preparation.
Any dilutions used to prepare turbidity standards, as well as blanks, must use degassed DI water. This is especially important for accurate low-end turbidity analysis, as there is often a positive bias due to bubbles introduced into the DI water solution when it is being produced/dispensed. This effect becomes more noticeable with lower NTU readings, and can cause challenges with performing an accurate calibration. To degas DI water, it must be dispensed into a very clean bottle or container, and left to sit for ~24h. You will see bubbles form on the side of the container as the water degasses. After degassing, it is ready to use for blanks and standards preparation.
When your turbidity QCs are failing, it is best to do the following:
- Ensure you are using Degassed DI water
- If you do not have this, prepare by leaving DI water to sit for 24h in a very clean bottle or container
- Repeat the QCs with a freshly-prepared standard
- If still failing, perform a new multi-point calibration, followed by x3 blanks then the same QC standards, all with fresh solutions
- If still failing the above, remove the flow cell and clean it, and also perform a new meter calibration with the set of sealed cuvette standards
- Then, reinstall the flow cell and perform a new free calibration, then a new multi-point calibration, followed by x3 blanks then the same QC standards, all with fresh solutions
- Ensure you are using Degassed DI water
- Why is it important to use Degassed DI Water for blanks and standards preparation when performing automated Turbidity analysis?
Any dilutions used to prepare turbidity standards, as well as blanks, must use degassed DI water. This is especially important for accurate low-end turbidity analysis, as there is often a positive bias due to bubbles introduced into the DI water solution when it is being produced/dispensed. This effect becomes more noticeable with lower NTU readings, and can cause challenges with performing an accurate calibration. To degas DI water, it must be dispensed into a very clean bottle or container, and left to sit for ~24h. You will see bubbles form on the side of the container as the water degasses. After degassing, it is ready to use for blanks and standards preparation.
- Are BOD results affected by atmospheric pressure changes?
Generally speaking, dissolved oxygen readings are dependent on atmospheric pressure. This is because the density of water changes with pressure, and this in turn affects the mg/L of dissolved oxygen. Here is a resource describing the “why” behind this. It is also dependent on temperature for similar reasons.
The YSI meter does compensate for changes in atmospheric pressure. Here is a document explaining this. The document also provides advice for troubleshooting when challenges are occurring in BOD testing. One important aspect is to make sure you are calibrating the probe before each day of testing.
- Why is there liquid leaking from my TitraSip system?
The presence of liquid beneath the Titrasip would be related to one of two things:
• Overflow from the vessel
• Leaks from the tubingGenerally speaking, the rinse pump for the Titrasip should be able to pump indefinitely with no risk of overflowing over the top of the glass vessel, and this is because of the top waste line connection. That top waste line should be able to drain liquid at the same rate that the pump delivers the rinse water, but to do this it relies on a clear line with no blockages, running downhill for its full length to the drain or waste container. Often when challenges arise with overflowing, it is due to part of the drain line not running downhill, or running horizontally for too long of a distance. Since it is all gravity-based draining, any place in the line where liquid can settle makes it more difficult for liquid to drain from the vessel. The same thing occurs when growth builds up inside the waste line restricting the flow path.
There is a quick way to test whether overflowing is the source of these challenges:
1. Remove the top lid from the Titrasip vessel (storing the pH electrode in storage solution)
2. Test the drain valve with the front switch and also drain any liquid that was in the vessel before
3. Watching the vessel, use the front switch on the Titrasip to turn on the Rinse pump. Keep your finger on the switch.
4. As the vessel fills, it should reach the top connection and start draining down the waste line. The liquid level may go above the connection for a brief second before the full draining starts, but it should not near the top of the glass vessel.
a. IF it continues filling past the top connection and the liquid reaches the top of the glass vessel, turn off the pump. This would confirm that there is a draining challenge leading to overflows.
b. IF the draining occurs properly, you should see the liquid level reach a stable level at the top connection, and the pump would be able to be left on indefinitely without overflowing. This would confirm there is NOT a draining challenge and it is likely a leak in the tubing. - I have an Error Code displayed on my PeCOD Analyzer, what does it mean?
For information about what the error code displayed on your PeCOD Analyzer represents, click here.
- Why did my PeCOD calibration fail?
It is possible that a PeCOD will fail its calibration. If this occurs, the PeCOD will notify you of the reason it did not pass. Common reasons are that the M value or C value are out of range. Please refer to page 19 of the PeCOD Pro Operation manual for more information.
- How do I replace the membrane of my ammonia ion selective electrode (ISE)?
” target=”_blank” rel=”noopener noreferrer”>Watch this short and informative demonstration on how to replace the membrane on an Orion ammonia ion selective electrode (ISE).
- How do I clean my color flow cell?
For optimal performance the flow cell should be cleaned from once a year to once a month, depending on the type of samples being analysed. Manually pump 50 ml of 0.1 N Hydrochloric Acid into the color module and leave the cell to soak overnight. In the morning, pump 100 ml of deionized water through the module to rinse the cell. This process can be automated to occur after every rack of samples run.
- How do I clean my conductivity probe?
For water soluble contaminants, rinse probe in deionized (DI) water. If ineffective, soak probe in warm DI water with household detergent for 15 – 30 minutes.
For oil-based contaminants, rinse probe in ethanol or acetone for short (5-minute) periods.
After cleaning, rinse probe in DI water to remove residual cleaning reagents. Perform a meter calibration before proceeding with sample analysis.
- Why is my conductivity analysis reporting negative values?
The reason you may have negative conductivity values at the low end is that there is a PC-Titrate software calibration being applied on the raw conductivity values from the meter. They are not wrong and it means the value is zero (0). You see this often with DI water measurements. If you turned off the software calibration then you would get the exact same values as displayed on the conductivity meter.
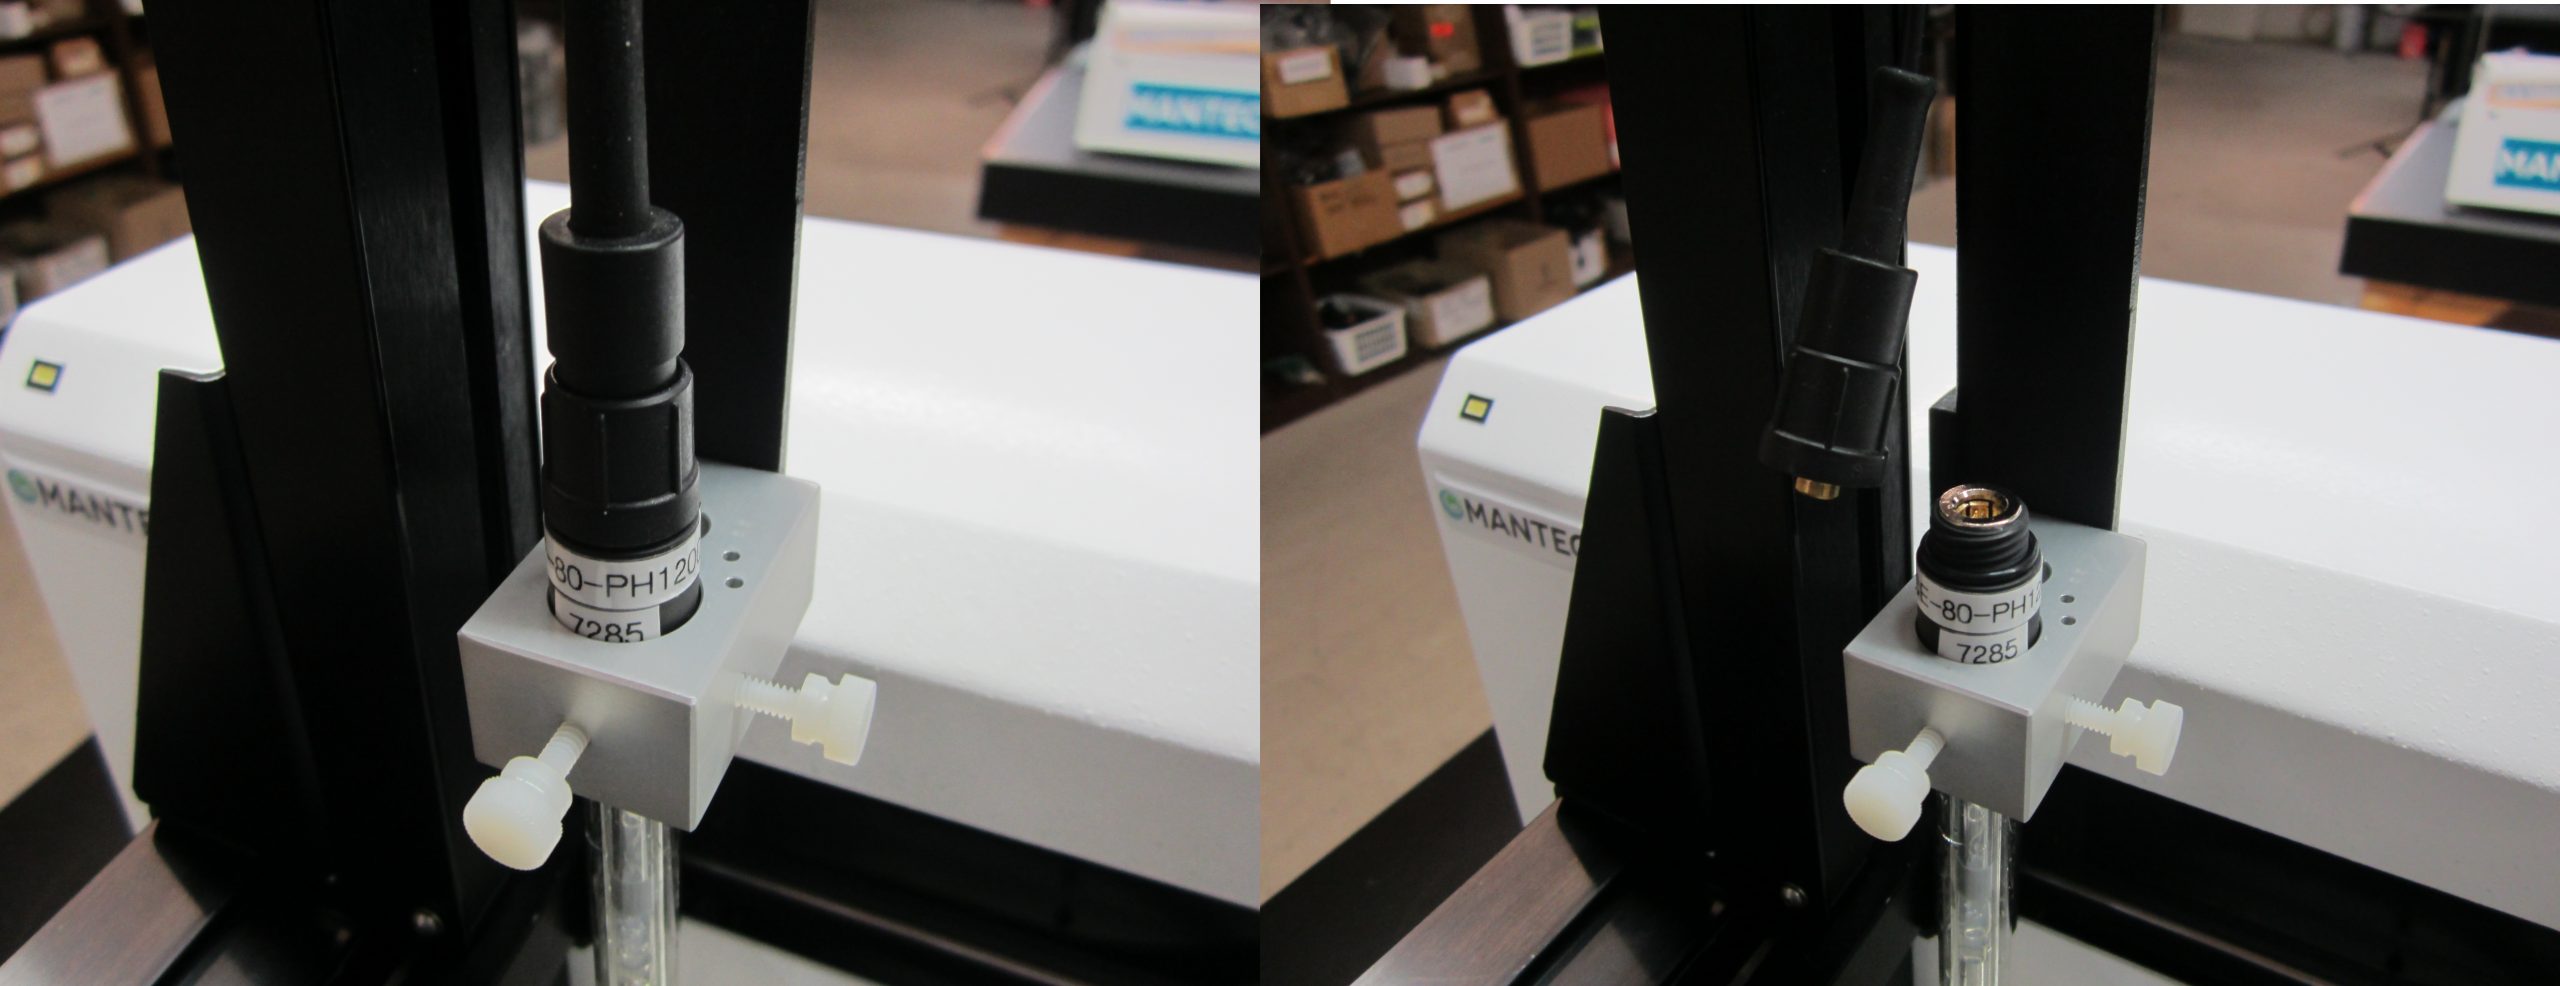
- How do I remove my electrode for maintenance?
Most MANTECH electrodes are connected to the Interface module via a BNC cable with a detachable S7 connection. This S7 connection is located at the electrode cable junction, allowing for easy detachment from the cable, and removal of the electrode while leaving the cable in place. This applies to all electrodes except the Ammonia Electrode and all Conductivity electrodes. See below for pictures of a pH electrode with the S7 connection attached, and detached.

- What should I do if my titration standard is measuring too high or too low?
If your titration standards are not reading the correct concentrations, for example, the alkalinity standard reading is low, first make sure the titrant has been standardized. Secondly, the precision of the results can indicate if this is a mechanical or chemical problem. If the results are precise, it is likely a chemical issue. Check your standards and titrant standardization. It is also possible that the sample volume may be incorrect.
- Why does the barometer reading on my YSI 4010 MultiLab IDS meter not match the reading documented by my local weather service?
The YSI MultiLab IDS meter outputs a true barometric pressure reading of its location, which is dependent on elevation above sea level.
Local weather services typically use a corrected barometric pressure reading, which corrects the reading to sea level.
To approximate the true barometric pressure reading from a corrected barometric pressure reading, use the following equation:
True barometric pressure [mmHg] = Corrected barometric pressure [mmHg] – (0.025 * local altitude [feet] )
- How do I calibrate my DO probe with the YSI 4010 MultiLab IDS Meter?
Unless otherwise specified in company or site-specific procedures, specifications, and regulations, a water vapor-air saturated calibration should be sufficient for probe calibration. For full calibration procedures, please refer to the following pdf.
- How do I set the sensor cap coefficients in my YSI 4010 MultiLab IDS meter?
Follow the step-by-step instructions in the pdf.
- How do I set the date and time in my YSI 4010 MultiLab IDS Meter?
Follow the step-by-step instructions in the pdf.
- How do I store my electrode block?
If only storing the electrode block for a short period of time (less than 4 weeks), rinse DI water through the PeCOD and leave the electrode block inside. Make sure all of the sample has been washed through by priming Port A several times. If storing for more than 4 weeks, put DI water through the PeCOD and then remove the electrode block to store outside the PeCOD. Flush the channels with 20-30 mL of DI water before pushing through about 10 mL of NaCl, leaving the channels filled. Tape the ends of the channels to ensure no leaks or crystallization occur. For more information, read the storage instructions here.
- How do I replace the sensor in my PeCOD® Analyzer?
Open the top plastic door by pushing down firmly on the front centre of the door until a “click” is heard, then release the door. Open the PeCOD analyzer module by pressing firmly down on the fixed bar, and lifting the front latching bar (should unlatch), then lift up the PeCOD sensor lid. Remove the old sensor by lifting it off of the pins and place the new sensor on the same pins with the “THIS SIDE UP” surface (blue side) facing you.
- Why does KHP measure high on PeCOD?
KHP (Potassium Hydrogen Phthalate) has historically been a common reference standard used in a variety of chemistry applications including the traditional dichromate COD test, where it does provide a result close to the theoretical COD result, and for TOC analysis. KHP is not recommended for use in the PeCOD COD analysis as it over reports compared to the theoretical COD amount. This is predominantly due to some pre-concentration of the molecule on the surface of the PeCOD sensor prior to analysis which is a peculiarity of KHP with the PeCOD COD method.
It is important to note that for all COD methods there are specific molecules whereby the individual analytical result is not well aligned to the theoretical value. For instance, organic compounds such as propionic acid, diethylamine or nicotinic acid could not be used as a COD standard for the dichromate COD method due to poor correlation to theoretical results but could be suitable for the PeCOD COD method. It is therefore important to chose a standard that provides a strong correlation to the theoretical result for the method employed, is a good reflection of the samples to be analysed, is suitable for general laboratory use and is readily available. For details on preparing sorbitol and glucose-based COD standards for the PeCOD COD method, read our technical bulletin 2017-029: PeCOD Standard Recipe.
- My conductivity meter is not communicating with PC-Titrate. What can I do to troubleshoot?
Checking the interface communication and software settings is a good place to start when troubleshooting a conductivity meter which has lost communication.
Service & Support Options
Below are the options that MANTECH offers for instrument service and support. Please contact us at [email protected] to receive a quote or to schedule any of these options.
On-Site Preventative Maintenance
Your instrument will be inspected, cleaned and adjusted by a MANTECH representative to ensure trouble-free operation and optimal performance. This is part of a single- or multi-year agreement that also includes:
-
PM Service Parts, offered at a 5% discount with purchase of the PM agreement
-
Additional serviceable parts at a preferential 15% Discount
(if needed while the Service Representative is on-site) -
Labor, travel & expenses
-
Evaluation of methods, as required
-
Software maintenance, as required
-
Additional training if required – time permitting
-
Emergency visits, in-house service and loaner modules at a preferential 15% discount
-
Toll-free telephone and web-based support
Remote Preventative Maintenance
A MANTECH representative will connect with through live video on a web-based platform and provide a detailed, step by step walkthrough of system preventative maintenance to the same standard as a MANTECH representative would perform. This is part of a single- or multi-year agreement that also includes:
-
PM Service Parts, offered at a 5% discount with purchase of the PM agreement
-
Additional serviceable parts at a preferential 15% Discount
(if needed while the Service Representative is remotely connected with you) -
Labor & expenses
-
Evaluation of methods, as required
-
Software maintenance, as required
-
Additional training if required – time permitting
-
Emergency visits, in-house service and loaner modules at a preferential 15% discount
-
Toll-free telephone and web-based support
Extended Warranty
Your MANTECH instrument will be warrantied against any serviceable parts needing service or replacement. This is part of a single- or multi-year agreement that includes:
-
Replacement of any serviceable parts
(excludes consumable & expendable parts such as tubing, electrodes, etc.) -
Emergency visits, in-house service and loaner modules, as required
-
Labor, travel & expenses
-
Evaluation of methods, as required
-
Software maintenance, as required
-
Hardware and software training, as required
-
Toll-free telephone and web-based support
On-Site Service
Billed as a half-day or full-day service. Instrument repairs are carried out on-site by a MANTECH representative. This is ideal for equipment that is difficult to ship or should not be moved, and for minimizing downtime.
In-House Service
Billed by the hour based on time spent on service, plus shipping. Instrument repairs are carried out at the MANTECH facility. This is ideal for equipment that can be shipped. Loaner modules are also available to reduce instrument downtime for a flat rate charge.
Remote Assistance
MANTECH is available to connect remotely to your instrument computer to answer questions, resolve challenges, and assist with any custom requests. TeamViewer is the software we use to connect remotely. Follow the link below, download the free option, and we will walk you through the rest!